Monday, August 15, 2011
Thursday, March 31, 2011
All about Dynamic Views for Authors - Blogger Help
Just played with the new Dynamic Views feature on Blogger (All about Dynamic Views for Authors - Blogger Help). I really like the timeline view. Cool shit. BTW this is my first post utilizing the Blogger extension for chrome - so less a content -heavy post but more a test ;-)
Monday, March 21, 2011
Slackline Project - Ground Anchors
This post is a follow up on my earlier posts Slackline Project - Requirements & Feasibility and Building A-Frames . You might have a look there to get the context.
Disclaimer: This goes on top of the standard disclaimer. I'm neither a experienced slackliner nor some sort of construction engineer. So if you want to utilize some information from below: Just do it but your should crosscheck the information with some experts before you apply it! No guarantees from my side.
The A-Frames are providing the height of the slackline, but still we need some fixpoint to attach the line to. Slackline set desigend for A-Frame using ground anchors like Slackline-Tools Groundanchor or Gibbon Slackline - Ground Anchor which create a fixpoint by screwing the anchor into the ground. That is pretty neat as it is easy to be done and you can easily remove the anchor afterwards. At the same time it is pretty expensive.
During the search for alternatives, I found that e.g. kids swings are commonly attached to the ground with the same kind of anchors (e.g. http://www.spielplatz-shop.de/product_info.php?info=p40691_Bodenanker--Erdanker-im-Paar.html). Those are way cheaper but differ at least in three points from the slackline- anchors:
- The length of the anchor is shorter. Therefore the anchor would go less deep into the ground and hence hold less. I found statements like if you dig the anchor 20cm below the ground level, you could double the strength of the anchor. Not sure if this is correct, but it makes sense that the length is important.
- The screw diameter is lower.
- The eye is not closed and might therefore hold less.
Some first tests show that this seams to work. I could build up the line and use it a couple of times already without indicating any issues. It is quite important that you have some massive bar at hand to be able to screw the anchors into the ground. Without it is a hard to get them in to the ground. Out of curiosity I removed on of the anchors from the ground. It wasn't really easy to just screw it out, but I needed to dig it out partly. Leaves pain in the back and a more secure feeling ...
Note that not each kind of ground is equally good to places such anchors.
Finally we need to select a line and some more connection parts to get everything together - that is going to happen in the next post.
Tuesday, March 8, 2011
Slackline Project - Implementation - Building A-Frames
This post is a follow up on my earlier post Slackline Project - Requirements & Feasibility. You might have a look there.


Disclaimer: This goes on top of the standard disclaimer. I'm neither a experienced slackliner nor some sort of construction engineer. So if you want to utilize some information from below: Just do it but your should crosscheck the information with some experts before you apply it! No guarantees from my side.

Looking at the low budget requirement, I decided to build my own frames rather to spend something like 50 - 90 EUR each. As I mentioned in my last post already: The web is full of self- and professional build a-frames. Should be possible to build something by my own. So I went into the garage to inspect the pile of left-over wood boards and found a former kitchen work disc (170 cm x 60 cm x 3 cm) made from massive beechwood.
From that I obtained two frames- roughly 80 cm high and support three different slackline heights (30, 50 and 75 cm). The basic design is depicted below.

I was not sure about the proper heights. I might want to add a fourth one between 50 and 75 cm at a later point of time. To be honest - I asked some friend to saw the frames as I don't have the proper tooling at home, but that shouldn't be to much of a problem if you are somehow a do-it-yourselfer.
That's how the frames look like after being glazed to be protected from the weather impact:

So that are my frames. I guess the low budget requirement wouldn't be fulfilled if I couldn't reuse the work disc for this purpose. In this case it might be a better idea to go for a design which goes with less amount of wood ( video linked from my earlier post.)
In the next post, I will talk about the fix points I have chosen to hold the line.
Sunday, March 6, 2011
The Slackline Project - Requirements & Feasibility
This is all about slacklining - the ability to do it in the own garden. Is it real project - certainly not, but sometimes it is good fun to bloat something up.
We got in touch with slacklining while we spent some time in a climbing hall. Its good fun to exercise your balance while you rest between climbing routes. There a people who bring it a couple of levels ahead like video - slackliner.at - that's certainly not what we are looking for - or ?!
Disclaimer: This goes on top of the standard disclaimer. I'm neither a experienced slackliner nor some sort of construction engineer. So if you want to utilize some information from below: Just do it but your should crosscheck the information with some experts before you apply it! No guarantees from my side.
Usually you fix your slackline just between two strong enough trees and you are done. Unfortunately our garden looks like this:

Quite some strong enough trees - but all planted in one single line with barely enough distance in between. That wan't be easy, but luckily we are the first ones to face this issue - there are solutions out there. So let's have a look on the requirements we have and then explore the solution space afterwards.
- Modifiability: The whole place is rented. From that perspective the construction should have minimal impact and should be reversible once we are leaving the place
- Low Budget: The whole thing is just a fun project and might enqueue itself into the things we started but never really took up. So the budget should be minimal to this one.
- Reliability: It is intended to be used by kids as well. So it should better not break and put us in risk to be hurt.
- Flexibility: It needs to be adjustable to different heights and lengths to support different user groups and different skill levels. We don't intend to move the setup out of the garden necessary.
- Inconspicuousness: The setup shouldn't dominate the whole garden. Mind the WAF.
- Time to Market: The whole thing should be done in a couple of days to be able to use it in the upcoming spring already.
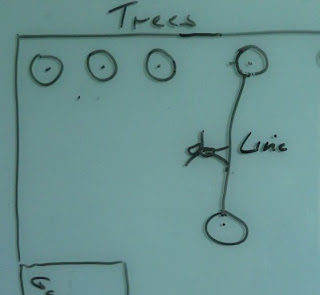
Solution 1 : Use the existing trees
Solution is depicted below.

Wouldn't be big fun and does not support the requirements for flexibility (only quite short distances are possible) and inconspicuousness (plants between the trees would certainly be impacted).

So this is not a Solution.
Solution 2: Plant new trees
Again the solution is depicted below.

Would be nice and has the big advantage that it supports the standard slackline setup - no fancy special stuff needed. However it does not necessary fulfills the modifiability requirement (not sure if the landlord would be happy to find a new tree in the middle of the garden) and really TTM is going to be a problem - certainly we would miss a couples of seasons.

So this is not a Solution either.
Solution 3: Use the garage as additional fixpoint
This solution utilizes the garage wall/corner as one fix point for the line. As a second one of the existing walls is used.

Browsing through the - at least German speaking part - of the internet, you find quite a lot of discussions how to implement such a setup. Looks like you would need to drill through the wall and fix a plate on the opposite side of the wall to guarantee the required resistance. Note that the line impacts the fix-points with quite some force (you find numbers which are easily reach the equivalent of 1000 kg / not that easy to calculate). Certainly you need some good understanding of the statics of your garage to build up such a solution. From that perspective it is a hard to implement this solution. Furthermore, it does not support the modifiability requirement. Sure the landlord wouldn't be to happy to find such a thing drilled to his garage(not talking about a collapsed wall in case it goes wrong ;-)). Finally the flexibility is not to good (only one height) and Inconspicuousness is also not supported as it would cross the whole garden. So, that is also not the Solution.
Solution 4 : Use ground anchors / frames
This solution does not require any trees or building to build up a slackline. It utilizes fix points at ground level and creates the height of the slackline by using frames. The frames are typically formed in a letter A shape. The solution is depicted below.

Mostly you find a-frames constructed from wood. The fix point are either established by some strong nails or specific ground anchors. You can find quite some information to build your own a-frames in the internet (e.g. Build a slackline frame ). Ground anchors specifically for slacklines are available by some brands but there are also other ground anchors (e.g. for fixing kids swing frames). There are also neat sets available like the Gibbon Independence Set or Slackline Tools - Frame Set. Overall this solution could fulfill all of the requirements above. Some of the available sets are offering quite a nice flexibility - even more than we actually need as we don't intend to move the set around. Problem might be the budget. Building frames and possible select cheaper anchors could help to reduce the cost, but will impact TTM and possible reliability.
Putting everything together - solution 4 is the most attractive solution. I will explore the do it yourself variant a little bit more closely and keep you posted on this.
Subscribe to:
Posts (Atom)